|
|
|
You should have some mechanical skills before attempting any engine maintenance! These are basic instructions, and you must knoe what you removed, when, and what order so you can reinstall them in order.
First, you have to remove everything in the way! You need to remove the Fan, clutch, and shroud, pump pully & drive belts.
Next, you need to remove the Crank Pully:
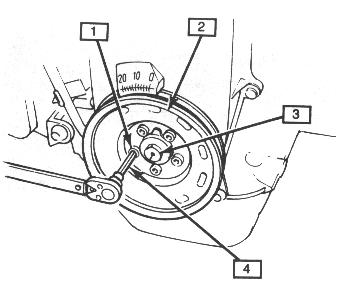
1. Crank Pully Bolt 2. Crank Pully
3. Center Bolt 4. 5mm Hex drive (used to remove pully
bolts)
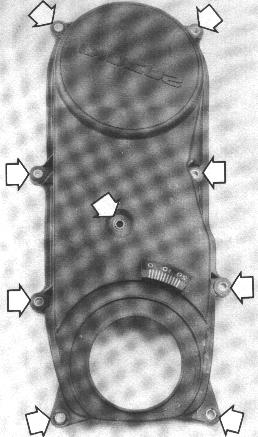
Once the fan stuff, and pully(s) are removed, then you need to remove
the Timing Belt cover:
Once the cover is removed, you will need to loosen the adjusting nut
and pully bolt on the Belt Tensioner:
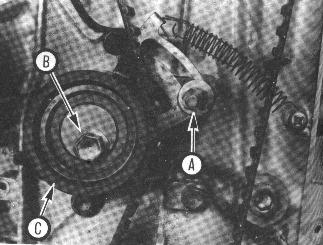 A.
Adjust Nut B. Pully Bolt C. TENSIONER
PULLY
A.
Adjust Nut B. Pully Bolt C. TENSIONER
PULLY
Once the the Adjust Nut, and Pully bolt are loose, move the pully as
far towards the water pump as possible.
Then, you can slip the timing belt from the sprockets.
Check the tensioner for roughness and excess play!
DO NOT MOVE THE CAM OR CRANK SPROCKETS! IF you do, then you will have to line up the Crank and Cam for piston number one at Top Dead Center before placing the new timing belt on! Note the timing marks on the crank and camshaft sprockets. IF YOU MUST! Allign the Cam and Crank at piston#1, Top Dead Center before removing the belt. Each sprocket has a small hole, with a line through it, and there is a small groove or "V" it alligns with on the engine.
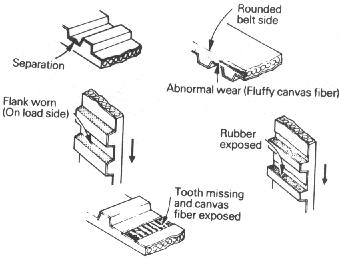
Now, once the timing belt is off, look at your new timing belt. Older belts use the Squared off teeth, while new ones have the rounded teeth. Make sure you have the correct belt for your sprockets! Never reinstall a belt that is in questionable condition.
BELT WEAR CONDITIONS
If there are Arrows on the belt, they must be pointing to the RIGHT when you put the new belt on the sprockets. If there isn't one, then paint one on, and place the belt back on the sprockets. The arrow will indicate to a mechanic, this is the way the belt must be put back on (if they replace any cam or crank oil seals).
Slip the new belt onto the Crank sprocket. While maintaining tension on the side of the belt opposite the tensioner, slip the belt onto the Camshaft sprocket.
Releace the Tensioner adjusting nut to allow spring tension against the belt.
Temporarily reinstall the crank pully, taking care to align the notch in the pully with the raised area on the sprocket.
Rotate the crank clockwise two complete revolutions. Recheck the alignment of the of the valve timing marks. If they do not align properly, loosen the tensioner, slip the belt off the crank pully, align the timing marks, reinstall the belt, and check alignment again.
Tighten the tensioner nut, then the bolt.
Reinstall all parts removed, in the opposite order, of course.
Start the engine and allow to reach normal operating temp, then road test.
THEORETICALLY, you should simply be able to replace the belt with the new one, and go, as long as you did not move any of the sprockets when removing or installing the belt. Most people do it this way, and do not test for alignment before replacing everything. When the belt wears, timing will be off, very little, and this is why you check alignment. The belt may have slipped a tooth, making the timing off. This is why the Cam and Crank sprockets must both align properly.
An experienced person will do just that: Replace the belt, and go.
It really isn't all that hard. It helps to have a second person around
with some experience also.